Theme images by kelvinjay. Powered by Blogger.

Latest

Revit Structure

AutoCAD

Revit Architecture

How to "explode" AutoCAD® blocks that don't allow you to "explode"

1. Select the "Block" want to explode. Enter the command LIST on the "command line" and press Enter.


2. Check the name of the "Block" you want to explode.


3. Enter the command BLOCK on the "command line" and press Enter.


4. Select the "Block" you want to explode from the "dropdown menu". Thick the box "Alow exploding" and press OK.


5. It will appear a "new window". Select  the option Redefine block.


Now you will be able to explode the "Block".

Revit® Structure - Linking an Architectural Model and Copying Shared Elements


Create a new Project using the Revit® Structural Template:


It is advised to start by "Transferring Views, Family Types, Elements Etc." from the Architectural Model to the new Structural model.


Link with Architectural Project


1. On the Insert Tab »»» Link Panel »»» Link Revit


2. Browse to Architectural_Project.rvt and click Open.


3. On the View Tab »»» Create Panel »»» 3D View dropdown »»» Default 3D View.


4. In the Project Browser, under 3D Views, double-click 3D to check what has been imported from the Architectural Model to the Structural Model. 


Copy/Monitor Elements


Copy Options

First you need to match the elements in both Structural and Architectural linked models by setting the copy options.


1. On the Collaborate Tab »»» Coordinate Panel »»» Copy Monitor dropdown »»» Select Link.


2. Click on the Linked Architectural Model. It will open a new Menu on the ribbon. Click on Options.


3. Click on the Tabs and choose the desired match for the elements (being the "Original Type" the elements present on the Architectural Project and the "New Type" the elements to be used on the Structural Project).


Copy Levels


1. In the Project Browser, under Structural Plans, select all levels and delete them. 


2. In the Project Browser, under Elevations, double-click in one of the elevations to see the levels defined on the Architectural Project. 


3. On the Collaborate Tab »»» Coordinate Panel »»» Copy Monitor dropdown »»» Select Link.


4. Click on the Linked Architectural Model. It will open a new Menu on the ribbon. Click on Copy and select Multiple.


5. Make a selection box which includes all the Levels. Click on Filter.


6. Click on Check None. Tick the box Levels. Click in Apply and then click in OK.


7. Click on Finish (small button on option bar). On Copy/Monitor contextual tab »»» Tools Panel »»» click Finish.


8. On the View Tab »»» Create Panel »»» Plan Views dropdown »»» Structural Plan.


9. On the List of Levels »»» Select Levels »»» Click OK.


Copy Grids


1. In the Project Browser, under Structural Plans, double-click on one of the plans.


2. On the Collaborate Tab »»» Coordinate Panel »»» Copy Monitor dropdown »»» Select Link.


3. Click on the Linked Architectural Model. It will open a new Menu on the ribbon. Click on Copy and select Multiple.


4. Make a selection box which includes all the Grid lines. Click on Filter.


5. Click on Check None. Tick the box Grids. Click in Apply and then click in OK.


6. Click on Finish (small button on option bar). On Copy/Monitor contextual tab »»» Tools Panel »»» click Finish.


Copy Columns


1. In the Project Browser, under 3D Views, double-click on default 3D view.


2. On the Collaborate Tab »»» Coordinate Panel »»» Copy Monitor dropdown »»» Select Link.


3. Click on the Linked Architectural Model. It will open a new Menu on the ribbon. Click on Copy and select Multiple.


5. Make a selection box which includes all the Structural Columns. Click on Filter.


6. Click on Check None. Tick the box Structural Columns. Click in Apply and then click in OK.


7. Click on Finish (small button on option bar). On Copy/Monitor contextual tab »»» Tools Panel »»» click Finish.

Revit® Structures - Create a View Template with Architectural Underlay

1. In the Project Browser, under Structural Plans, double-click in one of the Plan Views.


2. In the View Control Bar, select the scale you will be using for the Structural Plans.


3. In the View Control Bar change the Detail View for Medium.


4. In the View Control Bar change the Visual Style for Hidden Line.


5. In the Project Browser, right-click on the actual Plan View. Click on Create View From Template View...


6. Enter the name for the New View Template and click OK.


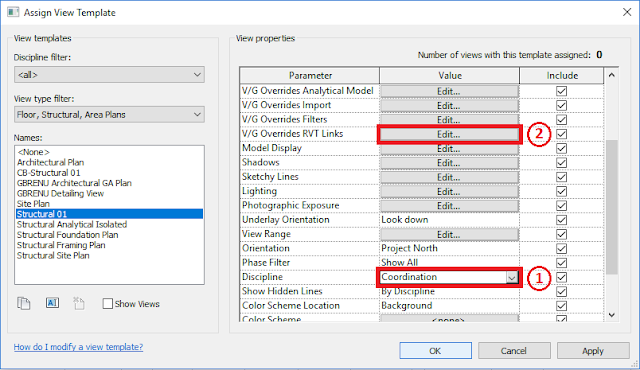
7. Change the Discipline for Coordination (to enable the visualization of the Architectural Walls and other Architectural elements). Click on Edit... to edit V/G Overrides RVT Links.


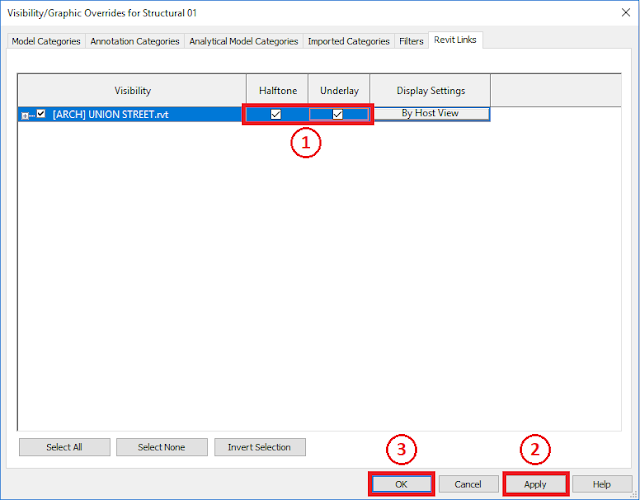
8. Tick the box Halftone. Tick the box Underlay. Click Apply and then click OK.


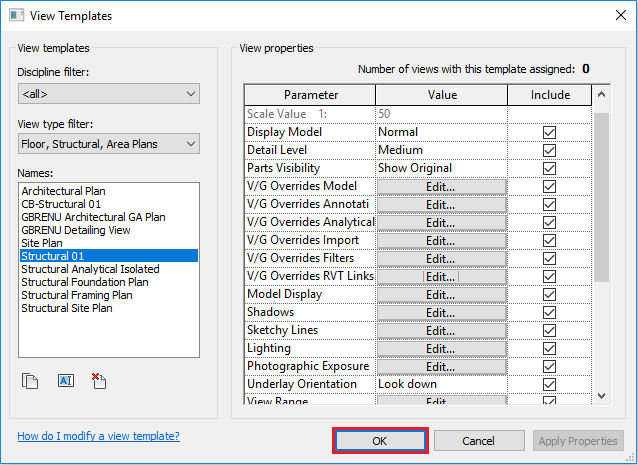
9. Click OK.


10. In the Project Browser, holding the Ctrl Key click on the remaining Plan Views.


11. In the Properties Pallete, click on View Template.


12. Select the recently created View Template, click in Apply then click in OK


Transferring Views, Family Types, Elements Etc. between Different Revit® Projects

Sources: 1


Autodesk® Revit® can save a lot of time when you're working on large projects or multiple similar projects. The best way to do that is by using Revit project templates.

Revit users can save system families (walls, floors, etc.), component families (doors, windows, furniture, etc.), sheets, schedules, annotations, graphics, and so on to their project templates. This can save a lot of time when starting a new project because you skip over the creation of schedules or importing needed families. Each project is different, however, and we can’t create a template that will suit all projects or a few templates that we can choose from our new project and the chosen template will fit it 100%.

 There are even situations when, for example, schedules from multiple different projects have to be used in a new project. Also, sometimes beginners forget to use the required project template and have problems transferring their work to a project template. There is a partial solution for that using Revit project linking, binding it afterwards, while losing annotations, detail items, views, etc. but the topic of this post is not about that way.

First of all, let’s see how the system family types, annotations, tags, view templates, etc. can be transferred between projects (those are just types, not designed elements of the project). How to Transfer Revit Project Standards

The first step is to open both projects – the one you would like to transfer things from, a source project, and the one you want to transfer things to, the target project. Leave an active project you want to transfer things to. Then you have to go to the Manage tab and choose the Transfer Project Standards tool.


How to Transfer Revit Project Standards 


The first step is to open both projects – the one you would like to transfer things from, a source project, and the one you want to transfer things to, the target project. Leave an active project you want to transfer things to. Then you have to go to the Manage tab and choose the Transfer Project Standards tool.


After that you’ll see the Select Items to Copy dialog box.


Next to Copy from you have to choose the opened source project and tick the categories you want to transfer to your target project. After pressing OK you might get some warnings or an option to choose what to do with duplicate elements. Now you are ready to use those elements in your project.


Ways to Transfer Revit Families from One Project to Another 


But what about component families like doors, windows, etc.? Well, Revit plugins like Smart Browser Free or Smart Browser Manage can be used to transfer component families between projects quickly or you can do it manually. The fastest way I found to do that is to save all families from the project to some folder and then to import required ones to another project.


To start with, open the source project where the required families are. Then, in Project Browser navigate to Families section and right-click on it. Choose Save... then choose a folder to save your families to, and next in Family to save field leave option.

Of course you can save needed families by right-clicking on them one-by-one in Project Browser, but it is way faster to export them all at once (you can use Purge Unused tool from the Manage tab to delete families that are not used in the project, so they won’t get saved).

After saving is done, open the target project. I guess you already know what to do next… You can open the folder with saved families, mark the required ones while holding the Ctrl or Shift key on your keyboard, and just drag them into your Revit project. Or you can use Load Family from the Insert tab and just like previously mark the families you want to import, while holding the Ctrl key, then click Open and your families are ready to use. This way is quicker than going through libraries, folders and loading needed families one-by-one. Also, you might not have some families in your libraries but have them only in some projects.


Transfer Schedules, Sheets & Drafting Views


 Now we need to transfer schedules, sheets, and drafting views. To do that, you just need to have the target project opened. Navigate to the Insert tab and choose Insert from File>Insert Views from File tool. Find your source project, click Open. Tick the views you need in your project and click OK. You might get some warnings about duplicate types which you can close by clicking OK. Now you can find your imported views in Project Browser.